
 |
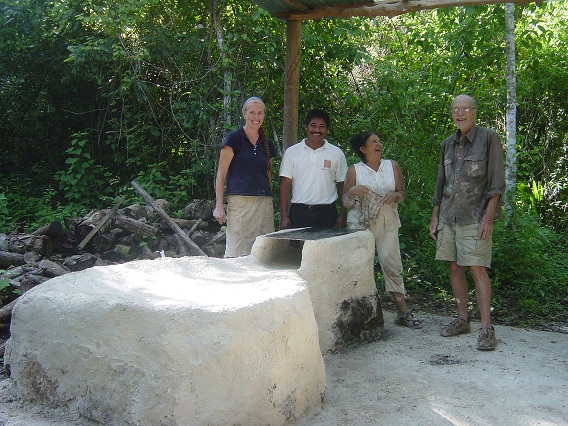
| Marge, Julio, Lea, and Ian behind the finished firehearth, front side. |
The firehearth, or fogon, is made from specific local rocks and white mal (limestone clay). There is usually a U shaped area where the fire is lit and the coals rest for the cooking. A grate or flat piece of steel (the comal or plancha) is then placed over top to use as the cooking surface like a combination of a stove top and griddle; perfect for putting pots for cooking wherever the heat is best for cooking, or to lay flat tortillas – easy to place on and pull off the flat surface with no need for other cooking pans.
As the fire burns, the rocks around and beneath the fire get hot so you can get a more even heat as you take the fire out from under the comal. You can also clean out the entire area under the comal after everything is good and hot, put the fire on top of the comal, and use the inside area as an oven.
As Marge and some of the local women use the firehearth (and, yes, that is Marge, not ME – way too complicated of a way to cook for my very limited cooking abilities) we will post pictures on how the firehearth is used. At this point I will show how we built the hearth.
Steps to building a local firehearth:
1. Locate a local person that knows how to build a firehearth.
The tour guide that we use most often for our guests is Gonzo. His family has a kitchen where they feed tourists after they do the tour of Chechem Ha Cave. We have been there a number of times and are friends with Gonzo’s mother Lea. We have eaten lunch there and have loved the flavor of the food. Marge, always looking at how food is prepared, saw Lea’s firehearth a few years ago and loved the idea of cooking over a wood fire. Over the years, as we have visited, Marge has talked with Lea and Lea agreed to help us make our firehearth when we were ready.
2. Decide on the design of your firehearth and get a list of materials to prepare for construction.
Marge, Julio, Chuck (our neighbor who would like to make a fire hearth too) and I took a trip to Chechem Ha to look at Lea’s kitchen. We all talked about the size of the cooking area, height of the stove and fire areas, wind directions for the smoke, how to use the stove and oven areas, etc. We then discussed the materials for building what we designed in our heads and Lea told us that all we needed was a lot of a special kind of rock and a specific kind of mal (local limestone-based dirt). That was it!
3. Collect up the rock.
The rock specific for the firehearth is not a solid limestone like what we have in our area. There is a lighter, softer, looks-almost-porous, limestone that can be found in many areas throughout the country. Chechem Ha has a lot around their place but Julio knew that where his family lived in La Gracia had a lot of this type of rock as well, and is a bit closer. So we drove to La Gracia and picked up 4 little pickup loads of rock, driving up the rough Georgeville Road very carefully each time so we didn’t break the truck. Our bonus was we got to visit with some of his family members and have lunch with them a couple of times during this process.
4. Collect up the mal.
We don’t have the special mal that is used for the plastering around here either so when we decided on the day to begin construction, we went to pick up Lea and collect the mal at the in the same trip. There are a couple of embankments alongside the Benque Road going south towards Chechem Ha that have veins of the this material where local people go to collect up bags of it. Julio, Ian (a friend that lives here in Belize part of the year) and I picked up Lea then she showed us the best material to collect for the plastering of the firehearth.
5. Construct with the materials you have.
Some of the rocks have flat sides; some we found that way, some we cut straight using a machete and a small hand maul. We also smoothed some of the sides of the rocks after they were in place using the machete.
 |
| Four little pickup trucks of stone to start. |
 |
| Lea and Julio shaping the first rocks |
 |
| Lea and Tom placing the first rocks |
 |
| Base filled, Lea mixing "cement" from natural limestone and some cement to secure the rocks. |
 |
| Julio and Lea building it to height and placing the rocks for the fire ring. The comal that goes on top of the fire ring is behind Julio. |
 |
| Comal in place, opening for the fire on the far side. Lea and Tom are planning the platform for the oven. |
 |
| Lea leveling the fill in the oven platform. Ian waiting for instructions. |
 |
| Lea leveling a higher level and explaining next steps. |
 |
| Lea sealing the cracks with more cement. |
 |
| Oven platform to the left, stove to the right. Oven platform ready for plaster. |
 |
| Lea plastering, Marge mixing plaster. |
 |
| Tom, happy to see that we are making great progress. |
 |
| Oven platform plastered. Tom cleaning Lea's face because the plaster splatters when she throws it on the wall, and she can't wipe it off because her hands are covered with wet plaster. |
 |
| Ian, Marge, Julio, and Lea all working on final plastering. |
 |
| Lea putting on the finishing touches. |
 |
| Lea doing the finishing touches, assisted by Ian mixing and passing the plaster. |
 |
| Tom, Marge, Julio, and Lea behind the finished fireheart, backside. |


No comments:
Post a Comment